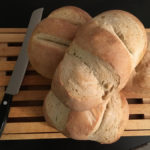
Extra-Tangy Sourdough Bread
Tangy homemade sourdough bread, made with your own sourdough starter, gives you that that wonderful sour flavor you want, direct from your kitchen!Adapted from King Arthur Flour
Servings 32 slices
Calories 70kcal
Equipment
- kitchen scale
- stand mixer fitted with a dough hook
- two half sheet baking pans
- Silpat or parchment paper
Ingredients
- 1 cup sourdough starter fed, i.e. starter that is bubbling and ready to use (8 oz, 240g)
- 1½ cups water lukewarm, 100° - 110°F (12 oz, 340g)
- 5¾ cups all-purpose flour divided, see Recipe Notes (25 oz, 708g)
- 2½ tsp kosher salt
- 1 Tbsp granulated sugar
Instructions
- Combine the starter, water, and 3½ cups (15 oz, 425g) of the flour, measuring the flour with a kitchen scale. Beat vigorously for 1 minute.
- Cover, and let this flour mixture rest at room temperature for 4 hours (you'll want to re-feed your sourdough starter at the same time), then refrigerate it for at least 12 hours. The longer the mixture sits, the tangier it becomes...you can refrigerate the started dough up to 3 days, although 2 days gives a good amount of flavor.
- When you're ready to continue, add the remaining 2¼ cups (10 oz, 284g) flour, sugar, and salt. Using a stand mixer fitted with a dough hook, knead the dough to form a smooth dough.
- Transfer the dough to a lightly oiled covered bowl and allow it to rise in a warm place until it’s light and airy, with visible gas bubbles. Depending on how active your starter is, this may take up to 4-6 hours. I let it rise in an oven with the light on…the bulb produces enough heat to create a warm environment, and the dough is usually ready in about 4 hours.
- Gently divide the dough in half. I divide my dough into quarters to make four mini loaves…that size is enough for my husband and I to eat over a couple of days.
- Gently shape the dough into two (or four) rounds or oval loaves, and place them on two half sheet baking pans lined with a Silpat or parchment paper. Cover with lightly greased plastic wrap and let rise until very puffy, about 2 to 4 hours (it can go longer; give them sufficient time to become noticeably puffy). Don’t worry if the loaves spread more than they rise; they’ll pick up once they hit the oven’s heat. Towards the end of the rising time, preheat the oven to 425°F, and put a small pan with 1 cup of boiling water at the bottom of the oven (this creates a steamy environment that sourdough loves).
- Slash the loaves. If you’ve made round loaves, try one slash across the center, and a second slash perpendicular to the first (like a plus sign), or slash in the pattern of your choice. For oval loaves, two to three diagonal slashes are fine. Make the slashes fairly deep; a serrated bread knife, wielded firmly, works well here.
- Bake the bread for 25 to 30 minutes, until it’s a very deep golden brown. I bake my loaves for 15 minutes, then rotate the pans from one rack to another, then bake for another 10-15 minutes. Remove the loaves from the oven, and cool on a rack.
- Store bread, loosely wrapped in plastic wrap, for several days at room temperature; freeze, well wrapped in plastic wrap, for longer storage.
Notes
The amount of flour and water you need to make a smooth, slightly sticky dough will vary based on your local weather conditions that day. You’ll need to experiment to find what works best for you.
If you’re counting the timeline, you’ll notice that it takes about 1-1/2 days to make the bread from start to finish. Just make sure you give yourself ample time to let the dough rest and rise.
This bread takes some practice to get right. Don’t be discouraged if it doesn’t rise at first…that door needed to be propped open somehow.
2/2019: I've updated the recipe to raise the baking temperature back to 425°F, reduced the cooking time to 25-30 minutes, and place a pan with 1 cup of boiling water at the bottom of the oven to create a steamy environment...all these changes from my original post [350°F, 30-35 minutes, spray loaves with water] makes for a nice crusty brown loaf. Score!
Did you make this recipe? Please share your pictures with the world on your social media…tag @outlandercast (on Instagram and Twitter) and use the hashtag #howtheymadeitoutlander. I can’t wait to see your creations!