Welcome back to our occasional series, “How They Made It,” where we explore the food and drink of Outlander. This time, we’re exploring Parisian baking from Dragonfly in Amber. Bon Apétit!
(Note: some of the links on this page can be with affiliates that give me a small commission for my referral at no extra cost to you, and as an Amazon Associate I earn from qualifying purchases.)
Heading to Paris with the Frasers
Paris was not good to Jamie and Claire. They arrived with hope, but left without Faith.
Dragonfly in Amber (and “the-Season-that-shall-not-be-named,” aka Season 2) was tough to get through, but the time there brought us Fergus, Master Raymond, and Mother Hildegarde (and let’s not forget Bouton!). What about Claire & Jamie’s wardrobe? Or the splendor of Jared’s apartment?
Magnus, Jared’s head butler, ran a tight household to be sure, right down to the food…everything was perfectly presented and definitely delicious. Remember the dinner party with Prince Charles and the Duke of Sandringham? The scene looking down the table had me in a spell.
I’m sure breakfast would have been lavish, with scrumptious pastries and perfectly baked croissants. Jared (and Magnus) would expect nothing less.

Fergus enjoys the remains of dinner (photo credit: Outlander STARZ)

Magnus, Jared’s head butler, somberly welcomes Claire back from L’Hôpital des Anges (photo credit: Outlander STARZ)
Baking homemade croissants is worth the effort
Have you ever tried to bake croissants? Pesky devils, they. In theory they shouldn’t be difficult, just time consuming.
You prepare a rich yeasted dough and a butter layer, then meld them together in a process called laminating (more on that later). After letting the layered dough rest, the croissants are shaped, baked, and yummmm…the smell in the kitchen alone is worth the effort.
One of the food blogs I follow, Sally’s Baking Addiction recently posted a challenge to make croissants, and she provided instructions with pictures and a video. Quite straightforward, really. I’ve even made croissants before in culinary school.
I decided to give it a go (for the sake of this blog, of course).
So what’s the trouble? You had to ask! It’s just that those darn rolled-up-bundles-of-buttery-joy don’t stay rolled up in the oven! The butter steams the flaky layers apart as they bake (something you want), but also steams them open if they’re not rolled up tightly enough (something you don’t want).
** SIGH ** Let’s back up a few paces and I’ll explain.
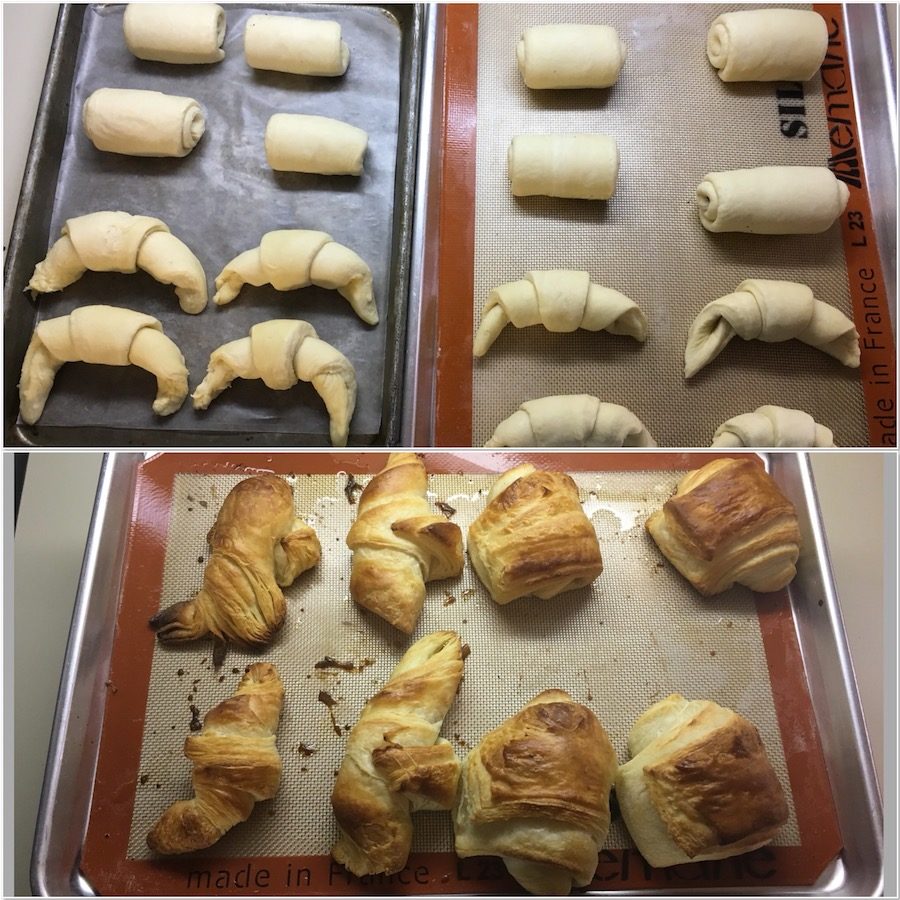
I had such high hopes as my croissants went into the oven. Ah well…they still tasted fantastic! By the way, the croissants on the tray on the upper left were destined to be frozen, hence the wax paper
Laminating dough = sealing up the butter
The process of laminating means you roll out dough and seal a butter layer into it like you’re sealing an envelope.
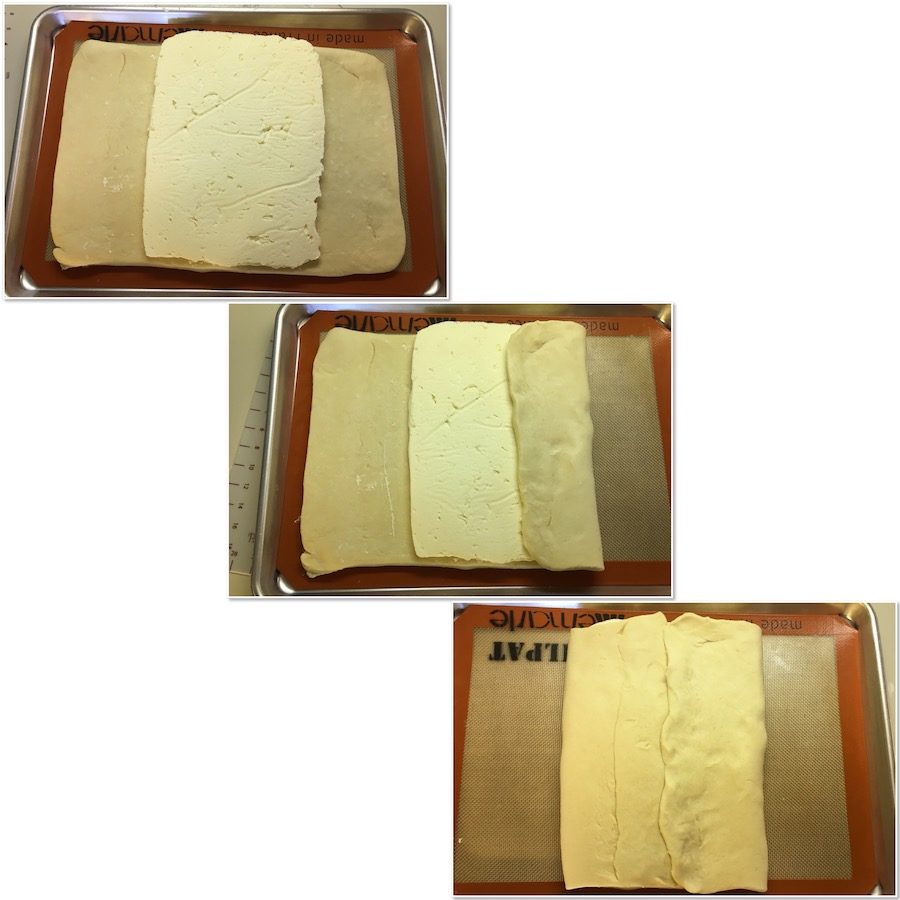
Lay the chilled butter slab in the rolled up dough, then seal it up
You roll the dough (with the butter inside) again, fold the dough in thirds like a letter (wow, you’ve really got this postal analogy going on!).
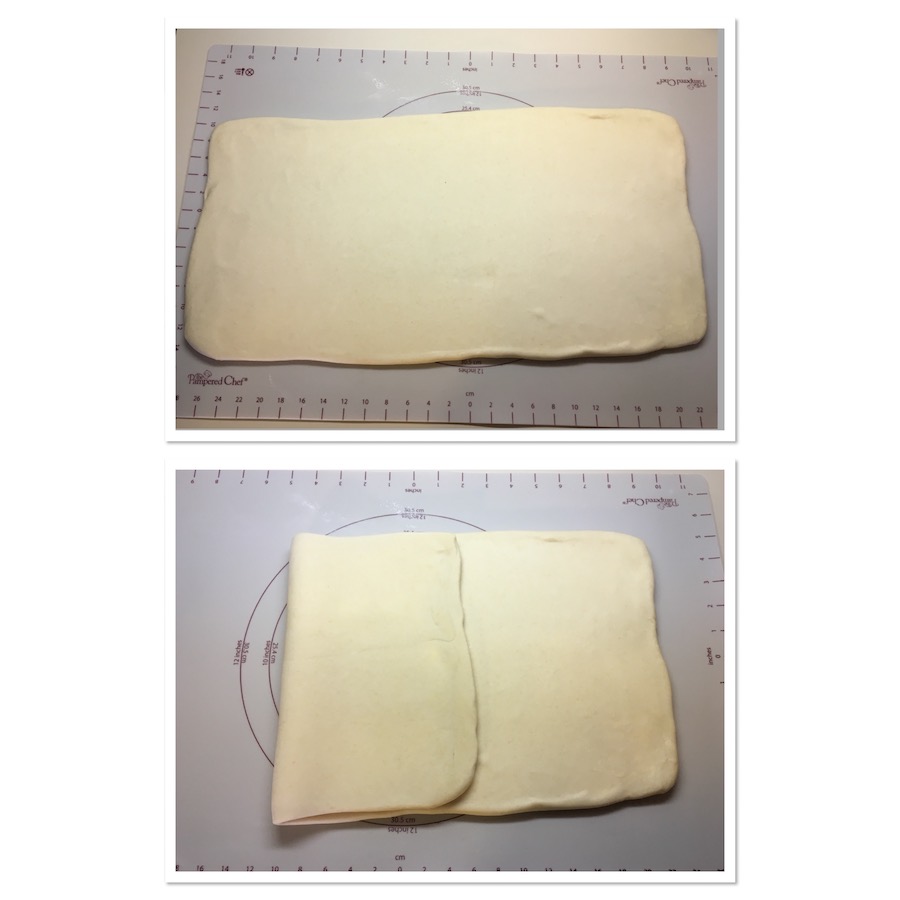
After rolling out the dough-and-butter envelope, start folding it like a letter
Rotate the dough 90 degrees…you’ve made what is called a turn. Repeat the folding and rolling out steps two more times. Simple!
Sally’s detailed photos and video on her post really show the process well (a picture is worth a thousand words after all, and this post is long enough!).
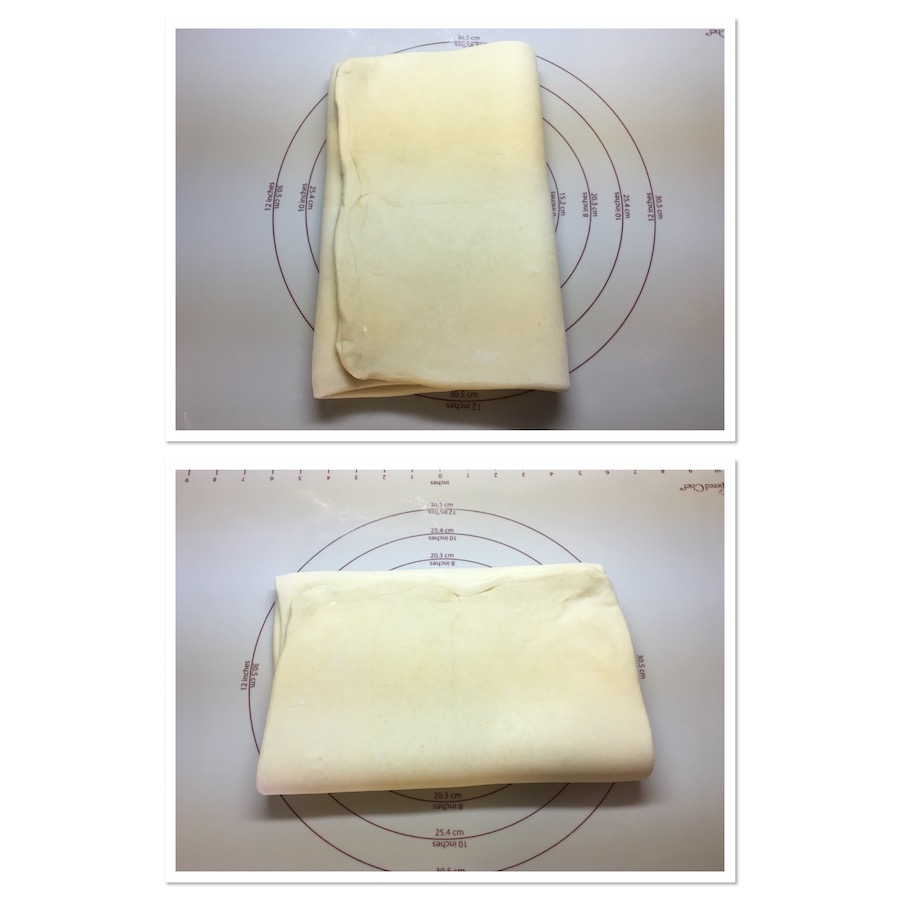
Finish folding up the letter, and turn the whole package 90 degrees. That’s the first turn (it wasn’t so hard, right?)
By doing all this rolling out and folding, you’re creating alternating layers of dough and butter, and the dough is getting thinner and thinner. It’s important to keep the dough cold so the butter doesn’t melt and ooze out when rolling (hence the long prep time).
Laminating dough is not difficult.
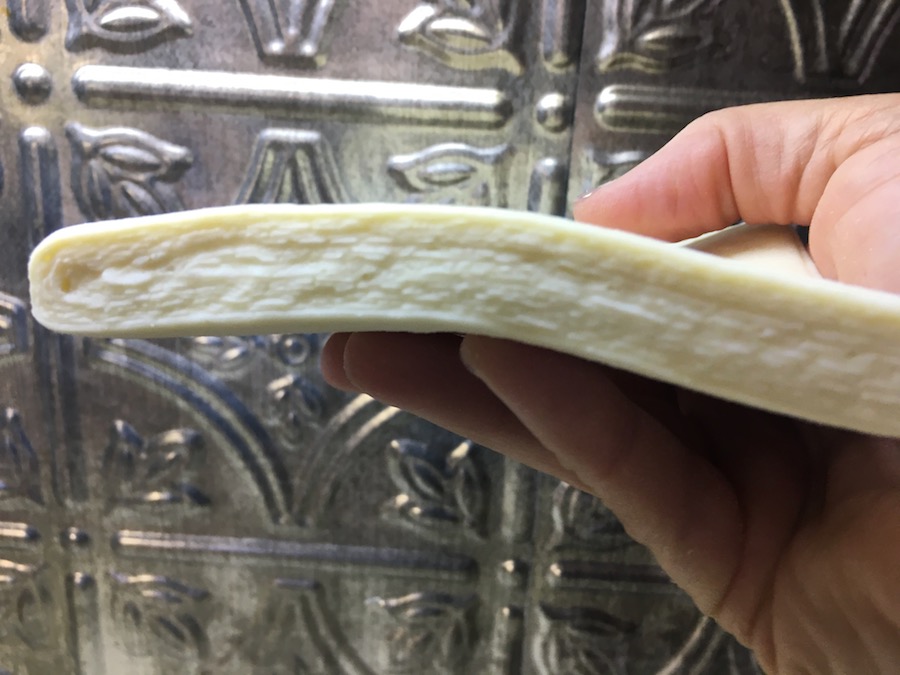
The dough after 3 turns…look at all those lovely layers!
Shaping croissants
When it’s time to shape the dough, you roll it up tightly and keep the rolls cold while they’re proofing (the resting time after shaping and before baking).
This step is where I went wrong…I didn’t realize just how tight the croissants had to be. I was too concerned with making sure the layers didn’t tear as I shaped the triangles and that they didn’t look too lopsided. Live and learn, I suppose.

After letting the dough rest overnight, it’s time to cut and shape the dough.
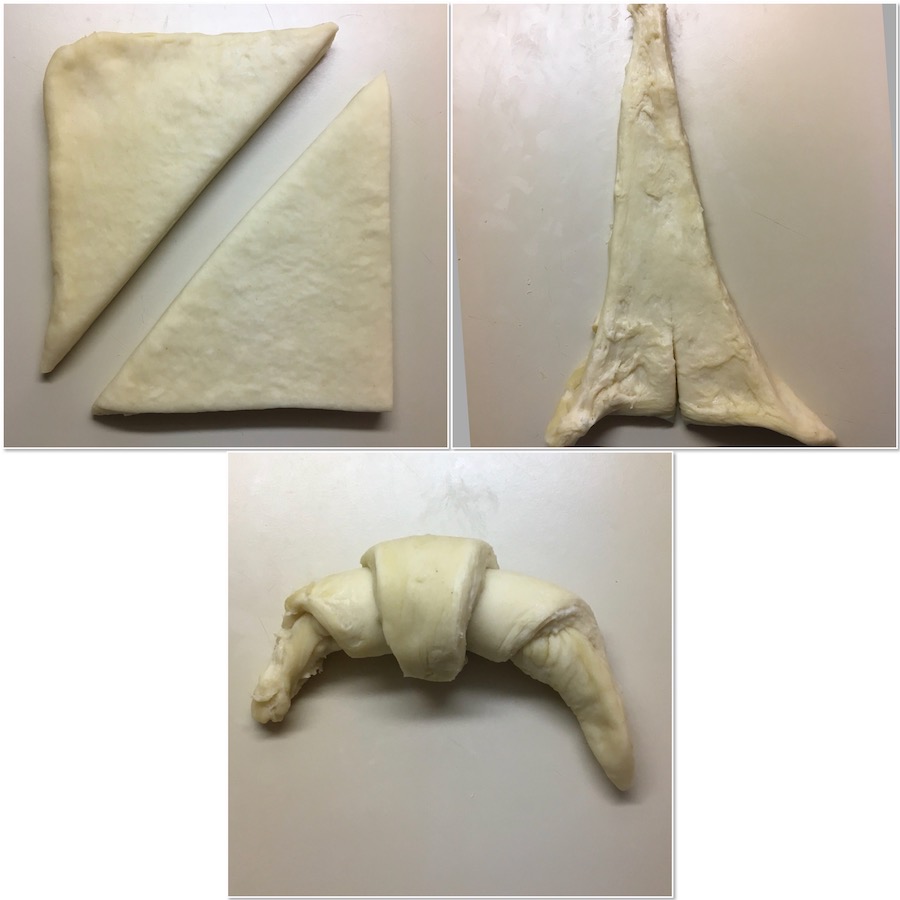
Cut a square in half diagonally, then stretch out the triangle and roll it up tightly, tucking in the point underneath.
Don’t be put off by the length of the recipe…I repeat it’s not hard, but you’ll want to set aside enough time to complete the process (I spread it over 2 days).
[Side note: doesn’t the stretched out triangle above look like the Eiffel Tower? I wonder if that’s where the inspiration for the shape came from? Just sayin’…]Adding embellishments to croissants
Sally also provided instructions for making Chocolate Croissants, so I tried those also. I used dark chocolate, and even riffed by using some almond paste as well. These rolled up easier than the plain croissants (no pesky triangles; they were more like doughy sleeping bags), but again I didn’t roll them up tight enough and they opened up also.
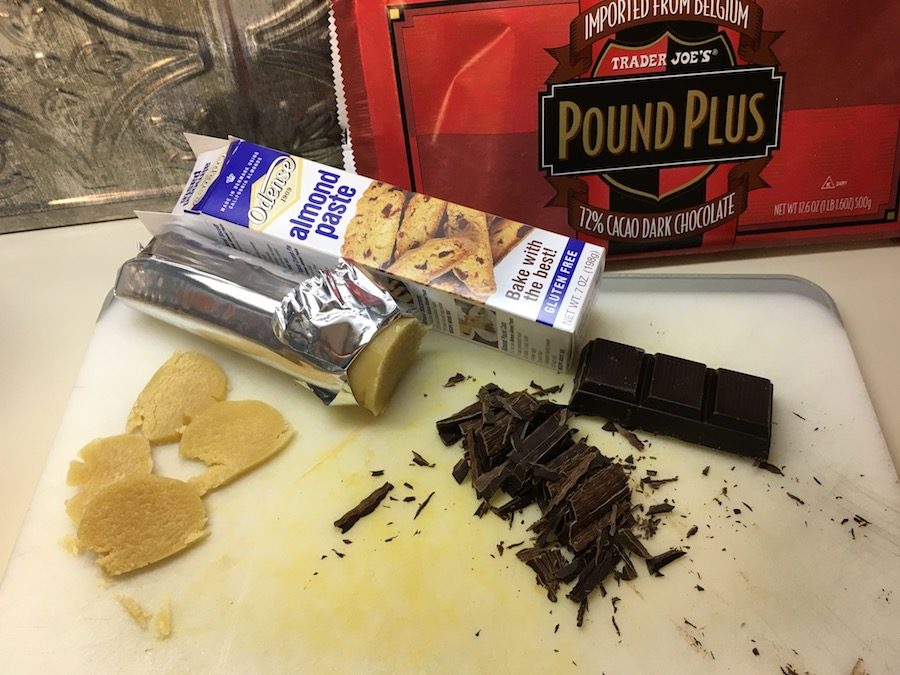
I decided to add a few embellishments
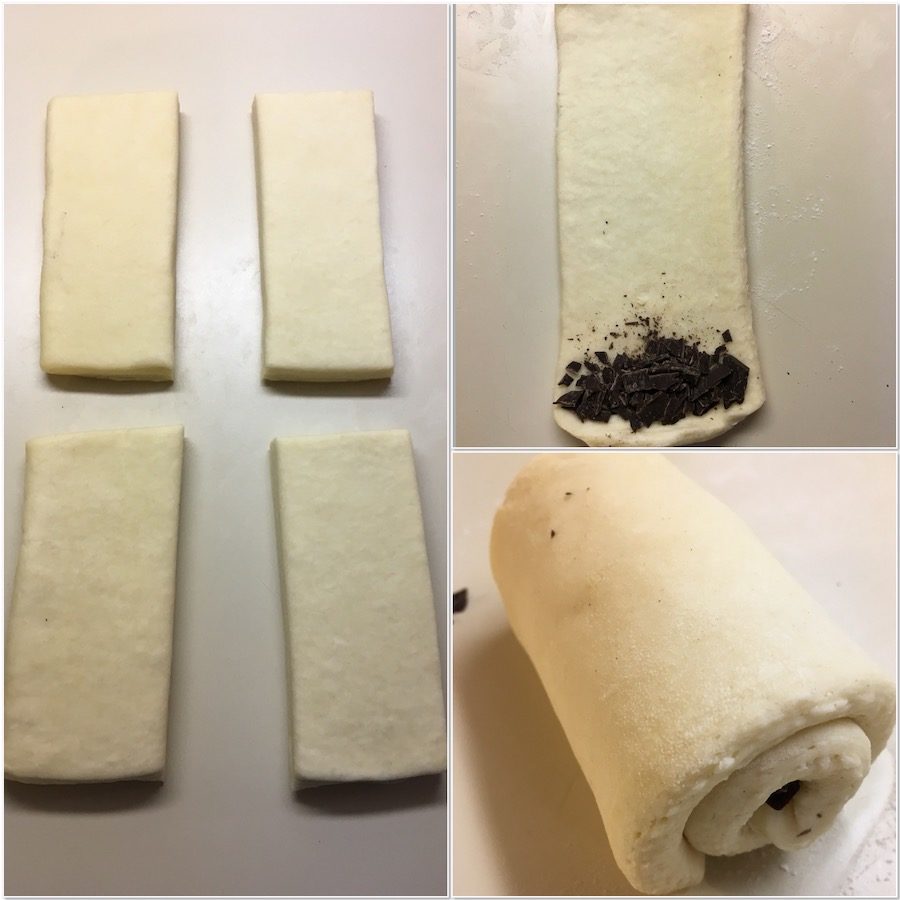
Instead of triangles, cut the squares into rectangles, then add your filling and roll up tight
Freezing shaped croissants before baking
One last point…do you want to freeze the shaped croissants to bake later? I found these instructions on halfbakedharvest.com:
“To freeze the croissants before baking, complete the steps through step. Once all the croissants have been rolled place them on a baking sheet lined with wax or parchment paper. Cover the baking sheets and freeze for about 2 hours. Remove the pans and place the croissants in a freezer safe bag and seal. Immediately place back in the freezer and freeze for up to 6 months. To bake, allow the croissants to thaw overnight in the fridge and then bake as directed.”
Since I’ve made Trader Joe’s frozen pre-made croissants with success (again, defrosting in the fridge overnight & baking in the morning), I think it’s safe to say this method works.

Flaky , buttery yumminess can be achieved!
Not perfect, but still tasty!
I’m always really hard on myself, especially when things I thought would be easy don’t go right.
Remember the sourdough bread? When I first started making sourdough bread, the loaves were more like sourdough doorstops. Slowly, and with lots of trial (and don’t forget error!), I got better so that now I can make sourdough successfully.
I’ve made French Macarons using that same trial & error and trial & success pattern. Even Sally posted about her early attempts at croissants, showing us photos of the deformed pastries she first made.
Not everything is picture perfect at first, but even the failures can taste divine. Magnus might not let me bake in his kitchen now, but after a few tries…who knows?
What is the toughest baking challenge you’ve taken on? How did you deal with it?
Homemade Croissants
Special Equipment
- two half sheet baking pans
- Silpat silicone mat or parchment paper
- stand mixer fitted with dough hook or hand mixer
- stand mixer fitted with a paddle or whisk attachment
- rolling pin
Ingredients
Dough
- ¼ cup unsalted butter, softened to room temperature (4 Tbsp, 60g)
- 4 cups all-purpose flour, plus more for rolling/shaping (17½ oz, 500g)
- ¼ cup granulated sugar, (3½ oz, 50g)
- 2 tsp kosher salt
- 1 Tbsp active dry or instant yeast
- 1½ cups milk, cold (12 oz, 340g)
Butter Layer
- 1½ cups unsalted butter, softened to room temperature (12 oz, 345g)
- 2 Tbsp all-purpose flour, (½ oz, 16g)
Egg Wash
- 1 large egg
- 2 Tbsp milk, (1 oz, 30g)
Procedure
- Read the recipe before beginning. Make room in the refrigerator for a half sheet baking pan. In step 6 and again in step 13, you will need room for 2 baking pans.
- Make the dough: Cut the butter in four 1 Tbsp pieces and place in the bowl of an electric stand mixer fitted with the dough hook attachment or bowl for a hand mixer. Add the flour, sugar, salt, and yeast. Turn the mixer on low-medium speed to gently combine the ingredients for 1 minute. With the mixer running, slowly pour in the milk. Once all of the milk is added, turn the mixer up to medium-high speed and beat the dough for at least 5 full minutes. (If you don’t have a mixer, knead by hand for 5 minutes.) The dough will be soft, and will (mostly) pull away from the sides of the bowl. If you poke it with your finger, it will bounce back. If after 5 minutes the dough is too sticky, keep the mixer running until it pulls away from the sides of the bowl. You really want to develop the gluten structure in the dough.
- Remove the dough from the bowl and, with floured hands, work it into a ball. Place the dough on a lightly floured Silpat silicone mat or lightly floured baking pan. Gently flatten the dough out and cover with plastic wrap or aluminum foil. Place the entire baking pan in the refrigerator and allow the covered dough to rest in the refrigerator for 30 minutes.
- Shape the dough: Remove the dough from the refrigerator. You can roll it out directly on the Silpat...you’re rolling it out into a rectangle in this step, so shaping it with your hands first helps the stretchy dough (it'll be soft). Begin flattening out the dough with your hands. the roll it into a 14- x 10-inch rectangle (be precise with your measurements) -- the dough will want to be oval shaped, but keep working the edges with your hands and rolling pin until you have the correct size rectangle.
- Long rest: Place the rolled out dough back onto the baking pan (you can easily transfer the dough using the Silpat or parchment paper). Cover the rolled out dough with plastic wrap or aluminum foil, place the entire baking pan in the refrigerator and allow the covered dough to rest in the refrigerator for 4 hours or overnight (even up to 24 hours is fine).
- Make the Butter layer: Begin this step 35 minutes before the next step so the butter can chill for 30 minutes. In a large bowl using a stand mixer fitted with a paddle or whisk attachment or hand mixer, beat the butter and flour together until smooth and combined. Transfer the mixture to a baking sheet lined with a Silpat or parchment paper (a Silpat is preferred because you can easily peel the butter off in the next step). Using a spoon or small spatula, smooth out the butter into a 7- x 10-inch rectangle. As before, be as precise as you can with this measurement. Place the entire baking sheet in the refrigerator and chill the butter layer for 30 minutes. There's no need to cover it...you want the butter layer firm, but still pliable. If it gets too firm, let it sit out on the counter for a few minutes to gently soften. The more firm the butter layer is the more difficult it will be to laminate the dough in the next step.
- Laminate the dough: In this step, you will roll out the dough into a large rectangle. Do this on a lightly floured counter instead of rolling it out on your Silpat. The counter is typically a little cooler (great for keeping the dough cold) and the Silpat is smaller than the measurement you need. Remove both the dough and butter layers from the refrigerator. Place the butter layer in the center of the dough and fold each end of the dough over it. If the butter wasn’t an exact 7- x 10-inch rectangle, use a pizza cutter or sharp knife to even out the edges. Seal the dough edges over the butter layer as best you can with your fingers. On a lightly floured counter, roll the dough into a 10- x 20-inch rectangle. It’s best to roll back and forth with the shorter end of the dough facing you. Use your fingers if you need to. The dough is very cold, so it will take a lot of arm muscle to roll. Again, the dough will want to be oval shaped, but keep working it with your hands and rolling pin until you have the correct size rectangle. Fold the dough lengthwise into thirds as if you were folding a letter. This is the 1st turn.
- If the dough is now too warm to work with, place folded dough on the baking sheet, cover with plastic wrap or aluminum foil, and refrigerate for 30 minutes before the 2nd turn (although you may not need to).
- 2nd turn: Turn the dough so the short end is facing you. Roll the dough out once again into a 10- x 20-inch rectangle, then fold the dough lengthwise into thirds as if you were folding a letter. The dough must be refrigerated between the 2nd and 3rd turn because it has been worked with a lot by this point. Place the folded dough on the baking sheet, cover with plastic wrap or aluminum foil, and refrigerate for 30 minutes before the 3rd turn.
- 3rd turn: Roll the dough out once again into a 10- x 20-inch rectangle. Fold the dough lengthwise into thirds as if you were folding a letter.
- Long rest: Place the folded dough on the lined baking pan, cover with plastic wrap or aluminum foil, and refrigerate for 4 hours or overnight (again up to 24 hours is fine).
- At the end of the next step, you’ll need 2 baking pans lined with a Silpat or parchment paper. The dough is currently on a lined baking pans in the refrigerator, so you already have 1 prepared.
- Shape the croissants: Remove the dough from the refrigerator. On a lightly floured counter, roll the dough out into an 8- x 20-inch rectangle. Once again, the dough is very cold, so it will take a lot of arm muscle to roll. The dough will want to be oval shaped, but keep working it with your hands and rolling pin until you have the correct size rectangle. Using a pizza cutter or sharp knife, slice the dough in half vertically. Each skinny rectangle will be 4-inches wide. Then cut 3 even slices horizontally, yielding 8 4- x 5-inch rectangles. Cut each rectangle diagonally to make 2 triangles. You have 16 triangles now. Work with one triangle at a time. Using your fingers or a rolling pin, stretch the triangle to be about 8-inches long. Do this gently as you do not want to flatten the layers. Cut a small slit at the wide end of the triangle, then tightly roll up into a crescent shape making sure the tip is underneath. Slightly bend the ends in towards each other. Repeat with remaining dough, placing the shaped croissants on 2 lined baking pans, 8 per sheet. Loosely cover with plastic wrap or aluminum foil and allow to rest at room temperature on the counter for 30 minutes, then place it in the refrigerator to rest for 1 to 3 hours...the shaped croissants should be cold going into the oven. When you poke the dough with your finger, it will slowly bounce back. That means they are ready to be baked.
- Preheat oven to 400°F (204°C).
- Whisk the egg wash ingredients together. Remove the croissants from the refrigerator. Brush each lightly with egg wash.
- Bake until the croissants are golden brown, about 20 minutes. Rotate the pans halfway through baking. If croissants show signs of darkening too quickly, reduce the oven to 375°F (190°C).
- Remove the croissants from the oven and place on a wire rack to cool for a few minutes before serving. They will slightly deflate as they cool.
- Croissants taste best the same day they’re baked. Cover any leftover croissants and store at room temperature for a few days or in the refrigerator for up to 1 week. You can also freeze for up to 3 months, then thaw on the counter or overnight in the refrigerator. Warm up to your liking.
Recipe Notes
Discovering Outlander after Season 1 first aired, Tammy quickly went down the rabbit-hole on social media and podcasts and found a world of like-minded fans who not only tolerated her obsession, but encouraged the madness! She combined her Outlander-inspired interest for scotch whisky with her continuing passion for baking and storytelling in her blog, Scotch & Scones…Explorations in a glass and in the oven. Joining the staff of Outlander Cast as the resident baker has brought Tammy full circle, from a podcast fan to a contributing writer. You can follow her on Twitter, Instagram, and Pinterest at @scotch_scones, and find her on Facebook at @scotchandsconesblog.


Leave a Reply
Your email is safe with us.